五一假期安排

  • 防抖和节流函数
  • new 构造函数实例
  • 手写apply/bind/call
  • 单例模式以及vue单组件
  • 箭头函数
  • 继承

函数防抖和节流

都阔以用于持续触发函数的优化中,防抖是,触发事件后n秒内,函数只能执行一次。如果在N秒内又重新触发,则需要重新计时开始。或者简洁点:连续触发的时候,只会执行一次。在停止N秒之后才能继续执行,典型的案例就是防止多次提交的按钮

而节流呢,是每间隔N秒,只执行一次。就像水龙头里的水,节流只能减缓水流,但事件依然会执行。频率变少了。典型案例是滚动scroll/resize事件

两者最大的区别就是节流是依然执行,可用于滚动事件。而防抖,如果一直在触发中,只有停下来的时候才会执行一次。

1
2
3
4
5
6
7
8
9
10
11
12
13
14
15
16
17
18
19
20
21
22
23
24
25
26
27
28
29
/**
* @description 防抖
* @param fn
* @param wait
* @param immedate 是否立即执行 true 立即执行
*/
export const debounce = (fn: any, wait: number = 1000, immedate: boolean = true) => {
let timeout: any;
return function(this: any) {
const self: any = this;
const args = arguments
if (timeout) {
clearTimeout(timeout)
}
if (immedate) {
const callNow = !timeout
timeout = setTimeout(() => {
timeout = null
}, wait)
if (callNow) {
fn.apply(self, args)
}
} else {
timeout = setTimeout(() => {
fn.apply(self, args)
}, wait)
}
}
}

防抖函数,主要是采用异步线程setTimeout进行延时执行,立即执行,是在触发事件的开始的时候就立即执行。而非立即执行版的防抖,就是执行完N秒之后,不触发事件才会执行
箭头函数没有自己的arguments,但是阔以通过命名参数的形式或者rest参数的形式传参

示例

1
2
3
// 防抖 非立即执行
const DivD: any = document.getElementById('Test')
DivD.addEventListener('mousemove', debounce(this.dataSetting, 1000, false), true)

addEventListener的第二个参数实际上是debounce函数里return回的方法,let timeout = null 这行代码只在addEventListener的时候执行了一次 触发事件的时候不会执行,那么每次触发scroll事件的时候都会清除上次的延时器同时记录一个新的延时器,当scroll事件停止触发后最后一次记录的延时器不会被清除可以延时执行,这是debounce函数的原理

1
2
3
4
5
6
7
8
9
10
11
12
13
14
15
16
17
18
19
20
21
22
23
24
25
26
27
28
29
30
/**
* @description 函数节流
* @param fn 执行函数
* @param wait 等待的时间
* @param type 默认是1 时间戳版 2定时器版
*/
export const throttle = (fn: any, wait: number = 1000, type: number = 1) => {
let previous = 0;
let timeout: any
return function(this: any) {
const context = this
const args = arguments
if (type === 1) {
// 时间戳版
const now = Date.now();
if (now - previous > wait) {
fn.apply(context, args);
previous = now
}
} else if (type ===2) {
// 定时器版
if (!timeout) {
timeout = setTimeout(() => {
timeout = null
fn.apply(context, args)
}, wait)
}
}
}
}

节流最大的特点就是减少事件的频率,可能由1毫秒到1000毫秒才能触发事件。事件依然会执行,频率变少。时间戳版和定时器版各有特色,都是满足一个假设条件才能执行事件,执行事件都是用apply绑定

示例

1
2
3
// 节流 定时器版
const iframe4: any = document.getElementById('Test4')
iframe4.addEventListener('mousemove', throttle(this.dataSetting, 1000, 2), true)

new 构造函数和模拟实现

如何理解执行上下文

context主要指代码执行环境,分为

  • 全局执行环境
  • 函数执行环境
  • eval执行环境

每一段js代码执行,都会先创建一个上下文环境

作用域

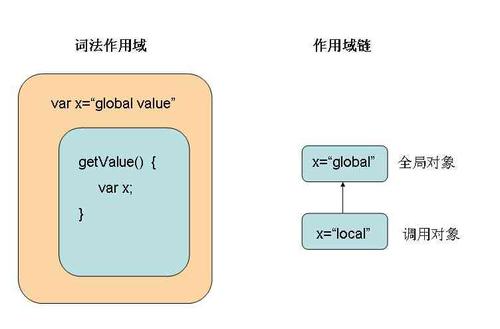
作用域其实可理解为该上下文中声明的 变量和声明的作用范围。可分为 块级作用域 和 函数作用域

如何理解作用域链

我们知道,我们可以在执行上下文中访问到父级甚至全局的变量,这便是作用域链的功劳。作用域链可以理解为一组对象列表,包含 父级和自身的变量对象,因此我们便能通过作用域链访问到父级里声明的变量或者函数。

由两部分组成:

  • [[scope]]属性: 指向父级变量对象和作用域链,也就是包含了父级的[[scope]]和AO
  • AO: 自身活动对象
    如此 [[scope]]包含[[scope]],便自上而下形成一条 链式作用域。

从当前环境向父级一层一层查找变量的过程

如何理解原型链

前期: 每个构造函数都有一个prototype属性,每个实例对象都有一个__proto__对象,而这个对象指向构造函数的prototype属性。
当我们访问实例对象的属性或者方法时,首先从自身构造函数中查找,如果没有就通过proto去原型上查找,这个查找的过程我们称之为原型链。

new 做了哪些操作

1.创建了一个新对象
2.这个对象也就是构造函数中的this,阔以访问挂载在this上的任意属性
3.这个对象还能访问构造函数原型上的属性,需要将对象与构造函数链接起来
4.默认返回this,如果手动定义返回原始值不影响,返回对象需要正常处理

手动实现一个new 操作符

1
2
3
4
5
6
7
8
9
10
11
12
13
14
15
16
17
18
19
20
21
22
23
/**
* @description 手动实现一个new操作符
* @param {Funtion} Con 构造函数
* @param {Array} args 参数
*/
export const Create = (Con: any, ...args: any[]) => {
// 验证构造函数是否是函数类型
if (typeof Con !== 'function') {
throw 'Create Function this first param must be a function'
}
// 继承Con原型上的prototype属性,又称原型上继承
const obj: any = Object.create(Con.prototype);
// or obj.__proto__ = Con.prototype
// or Object.setPrototypeOf(obj, Con.prototype)
console.log('constructor', Con);
console.log('obj', obj);
// 除去构造函数的其他参数
// 生成新的对象要绑定到构造函数上this对象上,并且传入剩余的参数
const res = Con.apply(obj, args)
// 如果返回是对象就是对象,否则返回obj
// 默认构造函数返回的是undefined
return typeof res === 'object' ? res : obj;
}

create说明

1.接受构造函数和其他参数
2.创建obj对象,同时要继承构造函数的原型链上的属性和方法,所以我们通过 Object.create(Con.prototype)实现,或者通过
setPrototypeOf 将两者联系起来。这段代码等同于 obj.proto = Con.prototype,即继承构造函数的原型链上的属性和方法有三种

1
2
3
4
5
6
// first
const obj = Object.create(Con.prototype)
// second 原型链继承
obj.__proto__ = Con.prototype
// third
Object.setPrototypeOf(obj, Con.prototype)

3.生成新的对象会绑定到构造函数上this对象上,并且传入剩余的参数即

1
2
// Con方法绑定this对象,这里的this即obj
const res = Con.apply(obj, args)

4.返回值处理

用法

1
2
3
4
5
6
7
8
9
10
11
12
13
14
15
16
17
18
19
20
21
22
23
24
25
private mounted() {
// 箭头函数不能通过new关键字调用
function Person(this: any, name: any) {
this.name = name
this.habits = 'Games'
}
Person.prototype.age = 30;
Person.prototype.sayName = function() {
console.log('sayName: i am', this.name);
}
// 创建person1实例
this.person1 = new (Person as any)('cpp')
console.log('typeof', typeof Person);
// 实例对象上的__proto__
// console.log('__proto__', this.person1.__proto__);
// console.log('prototype', Person.prototype);
// 实例对象上的__proto__ 全等于 构造函数的原型
console.log('===', this.person1.__proto__ === Person.prototype);
console.log('constructor', Person.prototype.constructor === Person);
this.person1.sayName();
// 模拟new的实现
const person2 = Create(Person, 'cpp222');
console.log('p2', person2.name);
person2.sayName()
}

模拟new简洁版

1
2
3
4
5
6
7
function Create(Con, ...args) {
// 创建一个对象,继承构造函数上的原型属性
const obj = Object.create(Con.prototype);
// 绑定到this上
const res = Con.apply(obj, agrs)
return res instanceOf 'Object' ? res : obj;
}

apply && call && bind()手动实现

call 用法

call() 方法在使用一个指定的 this 值和若干个指定的参数值的前提下调用某个函数或方法。

说起来有点拗口,就是指定this值,调用某个函数
举例子:

1
2
3
4
5
6
7
8
const bar: any = function(this: any, name: string, age: number) {
console.log('bar函数--this', this); // {value: 'chendapepeng'} 指向foo
console.log('bar函数--this.value', this.value);
}
const foo = {
value: 'cpp',
}
bar.call(foo, 'chendapeng', 30); // 执行bar函数,且传参

注意两点:

  • call 改变了this的指向,指向到 foo
  • bar 函数执行了

模拟实现

假设这样

1
2
3
4
5
6
7
const foo = {
value: 'cpp',
bar: function() {
console.log(this.value)
}
}
foo.bar(); // 'cpp'

但是这样多了一个属性,但是阔以删除,大体分为这几步,简单版的myCall

1
2
3
4
5
6
function myCall(con) {
const context = con || window; // 相当于foo
context.fn = this // foo.bar
context.fn()
delete context.fn
}

使用

1
2
3
4
5
6
7
8
9
const bar: any = function(this: any, name: string, age: number) {
console.log('bar函数--this', this); // {value: 'chendapepeng'} 指向foo
console.log('bar函数--this.value', this.value);
}
const foo = {
value: 'cpp',
}
Funtion.prototype.myCall = myCall
bar.myCall(foo)

传参

call 函数还能给定参数执行函数,直接上

1
2
3
4
5
6
7
8
mockCall: function (con, ...args) {
const context = con || window;
// 首先获取调用call的函数,比如bar.call(foo),就是bar函数
context.fn = this;
context.fn(...args)
// 用完记得删除调用对象里的方法
delete context.fn
},

返回

bar函数阔以有返回值的

1
2
3
4
5
6
7
8
9
10
11
12
const bar: any = function(this: any, name: string, age: number) {
console.log('bar函数--this', this); // {value: 'chendapepeng'} 指向foo
console.log('bar函数--this.value', this.value);
return {
value: this.value,
name,
age
}
}
const foo = {
value: 'cpp',
}

所以最终版的就是

1
2
3
4
5
6
7
8
9
mockCall: function (con, ...args) {
const context = con || window;
// 首先获取调用call的函数,比如bar.call(foo),就是bar函数
context.fn = this;
const res = context.fn(...args)
// 用完记得删除调用对象里的方法
delete context.fn
return res
},

bind实现

1
2
3
4
5
6
7
8
9
10
11
12
13
14
15
16
17
18
/**
* @description 模拟bind
* @param this 调用的方法
* @param con 当前调用者,对象
* @param args
*/
export const mockBind = function(this: any, con: any, ...args: any[]) {
// console.log('mock__this', this);
// console.log('mock__con', con);
const context = con || window;
const self = this
const fbound = (...bindArgs: any[]) => {
// console.log('context', context);
self.apply(this instanceof self ? this : context, [...args, ...bindArgs])
}
fbound.prototype = this.prototype
return fbound
}

Vue手动挂载组件

本文主要有以下内容

  • Vue.extend()
  • 单例模式
  • Vue.use() 和 Vue.prototype.myFunction

挂载组件步骤

在一些需求中,手动挂载组件能够让我们实现起来更加优雅。比如一个弹窗组件,最理想的用法是通过命令式调用,就像 elementUI 的 this.$message

vue.extend()

使用基础 Vue 构造器,创建一个“子类”。参数是一个包含组件选项的对象。预设了部分选项的vue实例构造器,返回一个组件构造器,用来生成组件,可以在实例上扩展方法,从而使用更灵活

1
2
3
4
5
6
7
8
9
10
11
12
13
14
15
16
17
18
<template>
<div id="app"></div>
</template>
<script>
// 创建构造器
var Profile = Vue.extend({
template: '<p>{{firstName}} {{lastName}} aka {{alias}}</p>',
data: function () {
return {
firstName: 'Walter',
lastName: 'White',
alias: 'Heisenberg'
}
}
})
// 创建 Profile 实例,并挂载到一个app元素上。
new Profile().$mount('#app')
</script>

结果如下

1
<p>Walter White aka Heisenberg</p>

Vue.extend创建的是一个Vue组件构造器,而不是一个具体的组件实例;里面预设了很多vue实例选项

单例模式

先看一个简单的例子getSingle

1
2
3
4
5
6
7
8
9
10
11
12
13
14
15
16
const Anima: any = function(this: any, name: string) {
this.name = name
}
const AnimalSingle: any = (() => {
let instance: any = null;
return (name: string) => {
if (instance) {
return instance
}
this.name = name
return instance = new Anima(name)
}
})()
const a1 = new AnimalSingle('cat')
const a2 = new AnimalSingle('dog')
console.log('===', a1, a2, a1 === a2); // Anima{name: 'cat'} Anima{name: 'cat'} true
  • 使用闭包封装了instance私有变量并返回一个函数
  • 利用 || 语法判断如果instance不存在则执行后者的实例化Anima方法,存在则直接返回instance,确保了只存在一个弹框实例
    实现方式:使用一个变量存储类实例对象(值初始为 null/undefined )。进行类实例化时,判断类实例对象是否存在,存在则返回该实例,不存在则创建类实例后返回。多次调用类生成实例方法,返回同一个实例对象。

构建属于自己的封装组件

用法,首先main.ts中全局引入

1
2
3
4
import Toast from './components/Toast/index';
// vue.use注册
// Vue.use(Toast);
Vue.prototype.$toast = Toast;

具体的组件用法

1
2
3
4
5
6
7
private showSuccess() {
(this as any).$toast.success({
type: 'success',
content: '这是测试tosat11',
duration: 2000
})
}

来看看如何实现的,主要思路是这样的

1
2
3
4
5
6
7
8
9
10
11
12
13
14
15
16
17
18
19
import toast from './toast.vue'
import Vue from 'vue'
// Vue.extend()生成一个Vue组件构造器函数,需要new一个实例才行
const ToastConstructor = Vue.extend(toast);
let instance: any = null
const Toast: any = (options: any) => {
instance = new ToastConstructor({
data: options
}).$mount();
console.log('instance', instance); // vueCopmponent vue组件实例
document.body.appendChild(instance.$el)
}
['success', 'error', 'info'].forEach((type: any) => {
Toast[type] = (options: any) => {
options.type = type;
return Toast(options);
};
});
export default Toast

如果想在main.ts中Vue.use()引入的话,导出一个传递参数的install方法即可

1
2
3
4
5
6
7
8
9
10
11
12
['success', 'error', 'info'].forEach((type: any) => {
Toast[type] = (options: any) => {
options.type = type;
return Toast(options);
};
});
...(上面的都一样,只需暴露一个install方法)
export default {
install: (vue) => {
vue.prototype.$toast = Toast
}
}

这样在main.ts中直接引入即可

1
2
import Toast from './components/Toast'
Vue.use(Toast)

为啥需要用use才能用,源码看了下,在GlobalAPI下

1
2
3
4
5
6
7
8
9
10
11
12
13
14
15
16
17
18
19
20
21
22
export function initUse (Vue: GlobalAPI) {
// toast导出的是funtion类型
Vue.use = function (plugin: Function | Object) {
const installedPlugins = (this._installedPlugins || (this._installedPlugins = []))
// 判断当前的插件是否在installedPlugins集合里,如果有立马返回
// 解释了多次使用Vue.use()只会运行一次
if (installedPlugins.indexOf(plugin) > -1) {
return this
}
// additional parameters 额外的参数,像options
const args = toArray(arguments, 1)
args.unshift(this)
// 如果插件有install,则绑定到plugin,并全传参
if (typeof plugin.install === 'function') {
plugin.install.apply(plugin, args)
} else if (typeof plugin === 'function') {
plugin.apply(null, args)
}
installedPlugins.push(plugin)
return this
}
}
1
2
3
4
5
6
7
8
9
10
11
12
/**
* Convert an Array-like object to a real Array.
*/
function toArray (list, start) {
start = start || 0;
var i = list.length - start;
var ret = new Array(i);
while (i--) {
ret[i] = list[i + start];
}
return ret
}

关于Vue.use(plugin)和Vue.prototype.$plugin = Plugin的区别
Vue.use(): 插件必须是一个对象,拥有install方法的对象,初始化插件必须有Vue.use()引入。同一个插件多次使用Vue.use()也只会运行一次。且vue.use()必须在new Vue()之前使用。
Vue.prototype.$plugin = Plugin: 在Vue组件构造器函数的原型上增加一个方法,运用的是函数原型的特性,即函数原型上的属性和方法,实例都能共享

箭头函数

基本用法

与变量解构结合,并隐式返回

1
2
3
4
5
6
const Test1 = ({value, num}: any) => ({total: value * num})
const res = Test1({
value: 100,
num: 10
})
console.log('res', res);

与普通函数的区别

没有this

箭头函数没有 this,所以需要通过查找作用域链来确定 this 的值。因为箭头函数没有 this,所以也不能用 call()、apply()、bind() 这些方法改变 this 的指向

没有arguments

但命名参数或者 rest 参数的形式访问参数:

不能通过 new 关键字调用

当通过 new 调用函数时,执行 [[Construct]] 方法,创建一个实例对象,然后再执行函数体,将 this 绑定到实例上。
箭头函数并没有 [[Construct]]方法,不能被用作构造函数,如果通过 new 的方式调用,会报错。
于是箭头函数也不存在 prototype 这个属性。

无new.target

因为不能使用 new 调用,所以也没有 new.target 值

哪些场景下不能使用箭头函数

借鉴知乎大佬王仕军的文章,原文请移步什么时候你不能使用箭头函数?

定义对象里的方法

在一个对象上,定义一个指向函数的属性,当方法被调用时,方法内的this指向方法所属的对象

  • 定义字面量方法

    1
    2
    3
    4
    5
    6
    7
    8
    9
    10
    const calculator = {
    array: [1, 2, 3],
    sum: () => {
    console.log(this === window); // => true
    return this.array.reduce((result, item) => result + item);
    }
    };
    console.log(this === window); // => true
    // Throws "TypeError: Cannot read property 'reduce' of undefined"
    calculator.sum();

    calculator.sum 使用箭头函数来定义,但是调用的时候会抛出 TypeError,因为运行时 this.array 是未定义的,调用 calculator.sum 的时候,执行上下文里面的 this 仍然指向的是 window,原因是箭头函数把函数上下文绑定到了 window 上,this.array 等价于 window.array,显然后者是未定义的。
    改造普通函数

    1
    2
    3
    4
    5
    6
    7
    8
    const calculator = {
    array: [1, 2, 3],
    sum() {
    console.log(this === calculator); // => true
    return this.array.reduce((result, item) => result + item);
    }
    };
    calculator.sum(); // => 6
  • 定义原型方法

    1
    2
    3
    4
    5
    6
    7
    8
    9
    function Person(this: any, name: any, game: string = 'cf') {
    this.name = name
    this.habits = game
    }
    Person.prototype.age = 30;
    Person.prototype.sayName = () => {
    console.log('sayName: i am', this.name);
    }
    this.person1 = new (Person as any)('cpp')

    使用传统的函数表达式就能解决问题

定义事件回调函数

this 是 JS 中很强大的特性,可以通过多种方式改变函数执行上下文,JS 内部也有几种不同的默认上下文指向,但普适的规则是在谁上面调用函数 this 就指向谁,这样代码理解起来也很自然,读起来就像在说,某个对象上正在发生某件事情。

但是,箭头函数在声明的时候就绑定了执行上下文,要动态改变上下文是不可能的,在需要动态上下文的时候它的弊端就凸显出来

1
2
3
4
5
const button = document.getElementById('myButton');
button.addEventListener('click', () => {
console.log(this === window); // => true
this.innerHTML = 'Clicked button';
});

修正后

1
2
3
4
5
const button = document.getElementById('myButton');
button.addEventListener('click', function() {
console.log(this === button); // => true
this.innerHTML = 'Clicked button';
});

定义构造函数

构造新的 Person 实例时,JS 引擎抛了错误,tslint也直接给出了提示An arrow function cannot have a 'this' parameter,还有Property 'name' does not exist on type 'Home'

1
2
3
4
5
6
7
8
9
const Person =  (this: any, name: any, game: string = 'cf') => {
this.name = name
this.habits = game
}
Person.prototype.age = 30;
Person.prototype.sayName = function() {
console.log('sayName: i am', this.name);
}
this.person1 = new (Person as any)('cpp')

改成普通函数即可

继承

借助原型链实现继承

子类Child的原型属性等价于父类的一个实例,并且传参

1
2
3
4
5
6
7
8
9
10
11
12
13
14
15
16
private extendPrototype() {
const Parent: any = function(this: any, name: string) {
this.name = name
}
const Child: any = function (this: any, name: string, age: number) {
this.age = age
}
//重点在这句 子类的原型指向的父类的实例
Child.prototype = new Parent('chendapeng')
const p1 = new Parent('wmh');
const c1 = new Child('cpp', 30);
console.log('p1,', p1);
console.log('c1,', c1);
p1.sayName() // wmh ——this.name——
c1.sayName() // chendapeng ——this.name——
}

子类能继承父类的属性和方法
缺点:

  • 创建child类的时候,不能像Parent传参
  • 子类创建的实例所在的原型链上的属性共享
    1
    2
    3
    4
    5
    6
    7
    8
    9
    10
    11
    12
    13
    14
    15
    16
    17
    18
    19
    20
    21
    22
    23
    private extendPrototype() {
    const Parent: any = function(this: any, name: string, arr: any) {
    this.name = name
    this.arr = arr
    }
    Parent.prototype.sayName = function() {
    console.log(this.name, '——this.name——')
    }
    const Child: any = function (this: any, name: string, age: number) {
    this.age = age
    }
    Child.prototype = new Parent('chendapeng', [1,2,3])
    const p1 = new Parent('wmh', [1,2,3]);
    const c1 = new Child('cpp', 30);
    c1.arr.push(4)
    const c2 = new Child('pp', 99)
    console.log('p1,', p1.arr); [1,2,3]
    console.log('c1,', c1.arr); // [1,2,3,4]
    console.log('c2,', c2.arr); // [1,2,3,4]
    // p1.sayName() // wmh ——this.name——
    // c1.sayName() // c1.sayName is not a function
    }
    子类实例c1和c2上的arr属性都是从父类继承过来的,改了c1.arr属性,c2.arr也发生了变化

    思考题

    1
    2
    3
    4
    5
    6
    7
    8
    9
    10
    var A= {n: 4399}
    var B = function() {this.n = 9999};
    var C = function() {var n = 8888};
    B.prototype = A;
    C.prototype = A
    var b = new B()
    var c = new C()
    A.n ++;
    console.log(b.n) // 9999
    console.log(c.n) // 4400

借助构造函数继承(经典继承)

先看代码,Parent 是父类,Child 是子类。通过 Parent1.call(this, name) 改变了 this 指向,使子类继承了父类的属性,即 Child 也有了 name 属性。

1
2
3
4
5
6
7
8
9
10
11
12
13
14
15
16
17
18
19
private extendConstructor() {
const Parent: any = function(this: any, name: string) {
this.name = name
}
Parent.prototype.sayName = function() {
console.log(this.name, '——this.name——')
}
const Child: any = function (this: any, name: string, age: number) {
this.age = age
// 这里是重点
Parent.call(this, name)
}
const p1 = new Parent('wmh');
const c1 = new Child('cpp', 30);
console.log('p1,', p1);
console.log('c1,', c1);
p1.sayName() // wmh ——this.name——
c1.sayName() // c1.sayName is not a function
}

缺点

  • 这种方式不能继承父类原型链上的属性,只能继承在父类显式声明的属性
  • 方法都在构造函数中定义,每次创建实例都会创建一遍方法。

组合继承

优点:融合原型链继承和构造函数的优点,是 JavaScript 中最常用的继承模式

1
2
3
4
5
6
7
8
9
10
11
12
13
14
15
16
17
18
19
private extendTwo() {
const Parent: any = function(this: any, name: string) {
this.name = name
this.arr = [1,2,3]
}
Parent.prototype.sayName = function() {
console.log(this.name, '——this.name——')
}
const Child: any = function (this: any, name: string, age: number) {
Parent.call(this, name)
this.age = age
}
Child.prototype = new Parent('cpp')
const c1 = new Child('wmh', 22);
c1.arr.push(5)
console.log('c1', c1); // [1,2,3, 5]
const c2 = new Child('cpp', 30);
console.log('c2', c2); // [1,2,3,
}

原型式继承

ES5 Object.create() 的模拟实现,将传入的对象作为创建的对象的原型。根据自己的业务需求,定义自己的原型对象。

1
2
3
4
5
funtion createObj(o) {
function F() {}
F.prototype = o
return new F()
}

测试下
1
2
3
4
5
6
7
8
9
10
11
12
13
14
var a = Object.create({name: 'cpp'})
console.log(a) // name属性放在了首层下的__proto__属性上,
/*
{}
__proto__:
name: 'cpp'
*/
接着用 createObj测试
var b = createObj({name: 'cpp'})
/*
{}
__proto__:
name: 'cpp'
*/

寄生组合式继承

1
2
3
4
5
6
7
8
9
10
11
12
13
14
15
16
17
18
19
function Parent (name) {
this.name = name;
this.colors = ['red', 'blue', 'green'];
}

Parent.prototype.getName = function () {
console.log(this.name)
}

function Child (name, age) {
Parent.call(this, name);
this.age = age;
}

Child.prototype = new Parent();

var child1 = new Child('kevin', '18');

console.log(child1)

组合继承最大的缺点就是会两次调用父构造函数,
一次是子类型实例的原型的时候

1
Child.prototype = new Parent();

另外一次是创建子类型的实例的时候

1
var child1 = new Child('kevin', '18');

如何避免一次重复调用呢

1
2
Child.prototype = Object.create(Parent.prototype);
Child.prototype.constructor = Child

最后实现寄生组合继承如下

1
2
3
4
5
6
7
8
9
10
11
12
13
14
15
16
17
18
19
20
21
function Parent (name) {
this.name = name;
this.colors = ['red', 'blue', 'green'];
}

Parent.prototype.getName = function () {
console.log(this.name)
}

function Child (name, age) {
Parent.call(this, name);
this.age = age;
}

// Child.prototype = new Parent();
Child.prototype = Object.create(Parent.prototype);
Child.prototype.constructor = Child

var child1 = new Child('kevin', '18');

console.log(child1)

proto是隐式原型,prototype是显式原型

原型总结

每个对象都有一个隐式原型,指向该对象的原型。实例化后通过proto属性指向构造函数的显式原型prototype,原型链是由原型对象组成,每个对象都有proto属性,指向创建该对象的构造函数的原型,通过隐式原型proto属性将对象链起来,组成原型链,用来实现属性继承和共享属性

参考文件