前后端路由差别
前端路由解决的问题
前端路由实现原理
对比react和vue路由实现原理
实现hash路由和history路由
Vue-router路由模式有几种
实现一个简单的vue-router
vue-router懒加载三种方式
路由导航守卫
其他细节问题
前后端路由差别
后端路由,切换路由时,服务端会去匹配并查找对应资源 ,返回给浏览器并渲染
前端路由, (spa)纯浏览器行为,是由浏览器控制的API(hash/history),当打开一个spa页面后,切换路由,浏览器改变地址栏url并通过js 展示对应页面(组件),即通过浏览器提供的接口hash/history来实现前端路由!
前端路由解决的问题 凡是整个项目都是 DOM 直出的页面,我们都称它为“传统页面”(SSR 属于首屏直出,这里我不认为是传统页面的范畴)
1 2 3 4 5 6 7 8 9 <body > <div id ="root" > </div > <script type ='text/javascript' > const root = document .getElementById('app' ) const divNode = document .createElement('div' ) divNode.innerText = '前端路由是啥?' root.appendChild(divNode) </script > </body >
页面所有的组件都是通过一个app.js的脚本,通过该脚本生成dom挂在到app节点下面
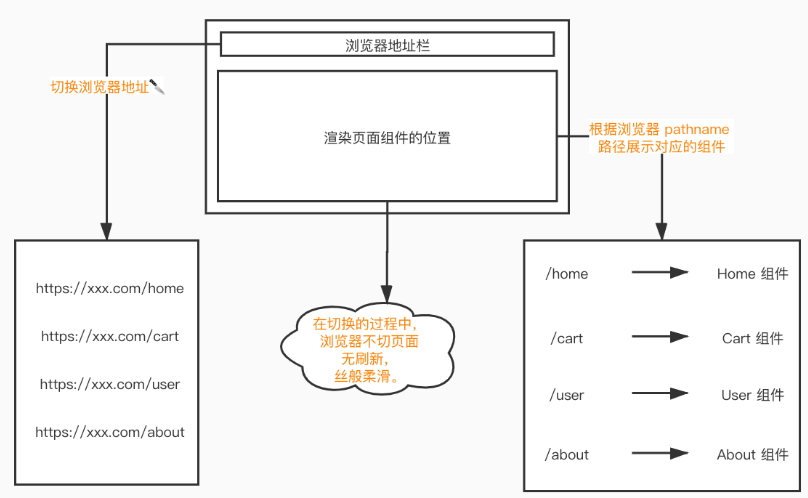
为了解决单页面网站,通过切换浏览器地址路径,来匹配相对应的页面组件(需保证不刷新页面),下图
前端路由 会根据浏览器地址栏 pathname/hash 的变化,去匹配相应的页面组件。然后将其通过创建 DOM 节点的形式,插入到根节点 <div id="app"></div> 达到无刷新页面切换的效果(达到改变视图的同时不会向后端发出请求),从侧面也能说明正因为无刷新,所以 React 、 Vue 、 Angular 等现代框架在创建页面组件的时候,每个组件都有自己的 生命周期
vueRouter 守卫以及各种钩子函数
全局前置守卫router.beforeEach 注册一个全局前置守卫:
全局解析守卫router.beforeResolve 注册一个全局守卫。这和 router.beforeEach 类似,区别是在导航被确认之前,同时在所有组件内守卫和异步路由组件被解析之后,解析守卫就被调用。
全局后置钩子 router.afterEach
路由独享的守卫
1
2
3
4
5
6
7
8
9
10
11
const router = new VueRouter({ routes: [ { path: '/foo' , component: Foo, beforeEnter: (to, from , next ) => { } } ] })
组件内的守卫
beforeRouteEnter
1
2
3
4
5
6
7
8
9
10
11
12
13
14
15
16
17
18
const Foo = { template: `...` , beforeRouteEnter(to, from , next) { }, beforeRouteUpdate(to, from , next) { }, beforeRouteLeave(to, from , next) { } }
vueRouter在项目中的应用 登录权限的校验,只有登录状态才能继续下去
1 2 3 4 5 6 7 8 route.beforeEach((to, from , next ) => { AppLogin.user().then(() => next() }).catch(() => location.href = '' }) })
vuerouter钩子函数的生命周期
失活组件调用beforeRouteLeave
调用全局的前置守卫beforeEach
在路由配置里调用 beforeEnter(路由独享守卫)
在被激活的组件里调用 beforeRouteEnter
调用全局解析守卫的 beforeResolve钩子
调用全局后置的 afterEach 钩子
触发 DOM 更新
前端路由实现原理 hash 哈希模式 利用a 标签锚点,浏览器通过hashchange 事件能监听到url地址上针对 ‘#’ 后面的变化。hashchange还能监听到如下变化
点击a标签,改变浏览器地址
浏览器的前进和后退行为
通过window.location方法,改变浏览器地址
1
2
3
4
5
6
7
8
9
10
11
12
13
14
15
16
17
18
19
20
21
22
23
24
25
26
27
28
29
30
31
32
33
34
35
36
<!DOCTYPE html > <html lang ="en" > <head > <meta charset ="UTF-8" > <title > hashchange hash模式</title > </head > <body > <div id ="app" > <ul > <li > <a href ='#/page1' > page1 </a > </li > <li > <a href ='#/page2' > page2 </a > </li > </ul > <div id ='router-view' > </div > </div > <script type ='module' > window .addEventListener('DOMContentLoaded' , loaded) window .addEventListener('hashchange' , HashChange) var routerView = null function loaded () routerView = document .getElementById('router-view' ) HashChange() } function HashChange () switch (location.hash) { case '#/page1' : routerView.innerHTML = 'page1' break ; case '#/page2' : routerView.innerHTML = 'page 2' break ; } } </script > </body > </html >
history 历史模式 history依赖的原生事件是popstate ,需要注意的是history.pushState()和history.replaceState()不会触发popstate事件,只有浏览器做出动作的时候,比如浏览器做出前进或者后退等(js代码中调用history.back()或者history.forward())
pushState 和 replaceState 都是 HTML5 的新 API,他们的作用很强大,可以做到改变浏览器地址却不刷新页面。这是实现改变地址栏却不刷新页面的核心方法
关于 popstate 事件监听路由的局限, history对象的 back(), forward() 和 go() 三个等操作会主动触发 popstate 事件,但是 pushState 和 replaceState 不会触发 popstate 事件,这时我们需要手动触发页面跳转(渲染)。
a标签的点击事件不会被popstate事件监听(这个popstate事件触发条件也是任性),解决思路是遍历页面所有的a标签,监听a标签的点击事件,同时阻止a标签的默认行为preventDefault,在点击事件的回调函数里获取a标签的href属性,再通过pushState去主动改变浏览器的location.pathname值,然后手动执行popstate事件的回调函数(下文中的PopChange函数),去匹配相应的路由,展示对应的页面组件
1
2
3
4
5
6
7
8
9
10
11
12
13
14
15
16
17
18
19
20
21
22
23
24
25
26
27
28
29
30
31
32
33
34
35
36
37
38
39
40
41
42
<!DOCTYPE html > <html lang ="en" > <head > <meta charset ="UTF-8" > <title > history 历史模式</title > <body > <div id ="app" > <ul > <li > <a href ='/page1' > page11 </a > </li > <li > <a href ='/page2' > page22 </a > </li > </ul > <div id ='router-view' > </div > </div > <script type ='module' > window .addEventListener('DOMContentLoaded' , loaded) window .addEventListener('popstate' , PopChange) var routerView = null function loaded () routerView = document .getElementById('router-view' ) PopChange() var aList = document .querySelectorAll('a[href]' ) aList.forEach(aNode =>'click' , function (e ) e.preventDefault() var href = aNode.getAttribute('href' ) history.pushState(null , '' , href) PopChange() })) } function PopChange () switch (location.pathname) { case '/page1' : routerView.innerHTML = 'page 1' break ; case '/page2' : routerView.innerHTML = 'page 2' break ; } } </script > </body > </html >
这里注意,不能在浏览器直接打开静态文件,需要通过 web 服务,启动端口去浏览网址。比如 live-server
Vue-router路由三种模式 1 2 3 4 5 6 7 8 9 10 11 12 13 14 15 16 17 18 19 20 21 22 23 24 let mode = options.mode || 'hash' this .fallback = mode === 'history' && !supportsPushState && options.fallback !== false if (this .fallback) { mode = 'hash' } if (!inBrowser) { mode = 'abstract' } this .mode = modeswitch (mode) { case 'history' : this .history = new HTML5History(this , options.base) break case 'hash' : this .history = new HashHistory(this , options.base, this .fallback) break case 'abstract' : this .history = new AbstractHistory(this , options.base) break default : if (process.env.NODE_ENV !== 'production' ) { assert(false , `invalid mode: ${mode} ` ) } }
hash: 使用 URL hash 值来作路由。支持所有浏览器,包括不支持 HTML5 History Api 的浏览器。
history: 依赖 HTML5 History API 和服务器配置。查看 HTML5 History 模式。
abstract: 支持所有 JavaScript 运行环境,如 Node.js 服务器端。如果发现没有浏览器的 API,路由会自动强制进入这个模式
手写vue-router 1 2 3 4 5 6 7 8 9 10 11 12 13 14 15 16 17 18 19 20 21 22 23 24 25 26 27 28 29 30 31 32 33 34 35 36 37 38 39 40 41 42 43 44 45 46 47 48 49 50 51 52 53 54 55 56 57 58 59 60 61 62 63 64 65 66 class History constructor () { this .current = null } } class VueRouter constructor (options) { this .mode = options.mode || 'hash' ; this .routes = options.routes || []; this .history = new History; this .routesMap = this .createMap(this .routes) this .init() } init() { if (this .mode === 'hash' ) { location.hash ? '' : location.hash = '/' ; window .addEventListener('load' , () => { this .history.current = location.hash.slice(1 ) }) window .addEventListener('hashchange' , () => { this .history.current = location.hash.slice(1 ) }) } else { location.pathname ? '' : location.pathname = '/' ; window .addEventListener('load' , () => { this .history.current = location.pathname }) window .addEventListener('popstate' , () => { this .history.current = location.pathname }) } } createMap(routes) { return routes.reduce((prev, item ) => { prev[item.path] = item.component return prev }, {}) } } VueRouter.install=function (Vue ) Vue.mixin({ beforeCreate() { if (this .$options && this .$options.router) { this ._root = this ; this ._router = this .$options.router Vue.util.defineReactive(this , 'current' , this ._router.history) } else { this ._root = this .$parent._root } } }) Vue.component('router-view' , { render(h) { let current = this ._self._root._router.history.current; console .log(current); let routesMap = this ._self._root._router.routesMap console .log(routesMap); return h(routesMap[current]) } } ) } export default VueRouter
vue-router路由懒加载 哪个组件用到就加载哪个组件,首屏渲染的时候不需要全都下载main.js,对比俩者的大小也能看出来
vue 异步组件
ES6 的 import()
webpack 的 require.ensure()
vue 异步组件 这种方法主要是使用了 resolve 的异步机制,用 require 代替了 import 实现按需加载
1
2
3
4
5
6
7
8
9
const Main = (resolve ) => require (['./main' ], resolve);export default new Router({ routes: [ { path: '/' , component: Main }, ] })
es6中的import函数 按需加载,可以理解也是为通过 Promise 的 resolve 机制。因为 Promise 函数返回的 Promise 为 resolve 组件本身,而我们又可以使用 import 来导入组件
1
2
3
4
5
6
7
8
9
const Main = () =>import ('./main' )export default new Router({ routes: [ { path: '/' , component: Main }, ] })
3.webpack 的 require.ensure() 这种模式可以通过参数中的 webpackChunkName 将 js 分开打包
1
2
3
4
5
6
7
8
export default new Router({ routes: [ { path: '/' , component: (resolve ) => require .ensure([], () => resolve(require ('@/components/main' )), 'main' ), }, ], })
路由导航守卫 正如其名,vue-router 提供的导航守卫主要用来通过跳转或取消的方式守卫导航。有多种机会植入路由导航过程中:全局的, 单个路由独享的, 或者组件级的。
其他问题 关于子路由刷新的解决方式 history模式子路由刷新会404,因此需要后端配合,将未匹配到的路由默认指向html文件
浏览器(环境)兼容处理 history 模式中pushState、replaceState是HTML5的新特性,在 IE9 下会强行降级使用 hash 模式,非浏览器环境转换成abstract 模式。
router-link router-link点击相当于调用$router.push方法去修改url
比起写死的 <a href="..."> 会好一些,理由如下:
无论是 HTML5 history 模式还是 hash 模式,它的表现行为一致,所以,当你要切换路由模式,或者在 IE9 降级使用 hash 模式,无须作任何变动。
$route和$router的区别 $route是当前路由信息对象,包括path,params,hash,query,fullPath,matched,name等路由信息参数。
参考